Photolemur
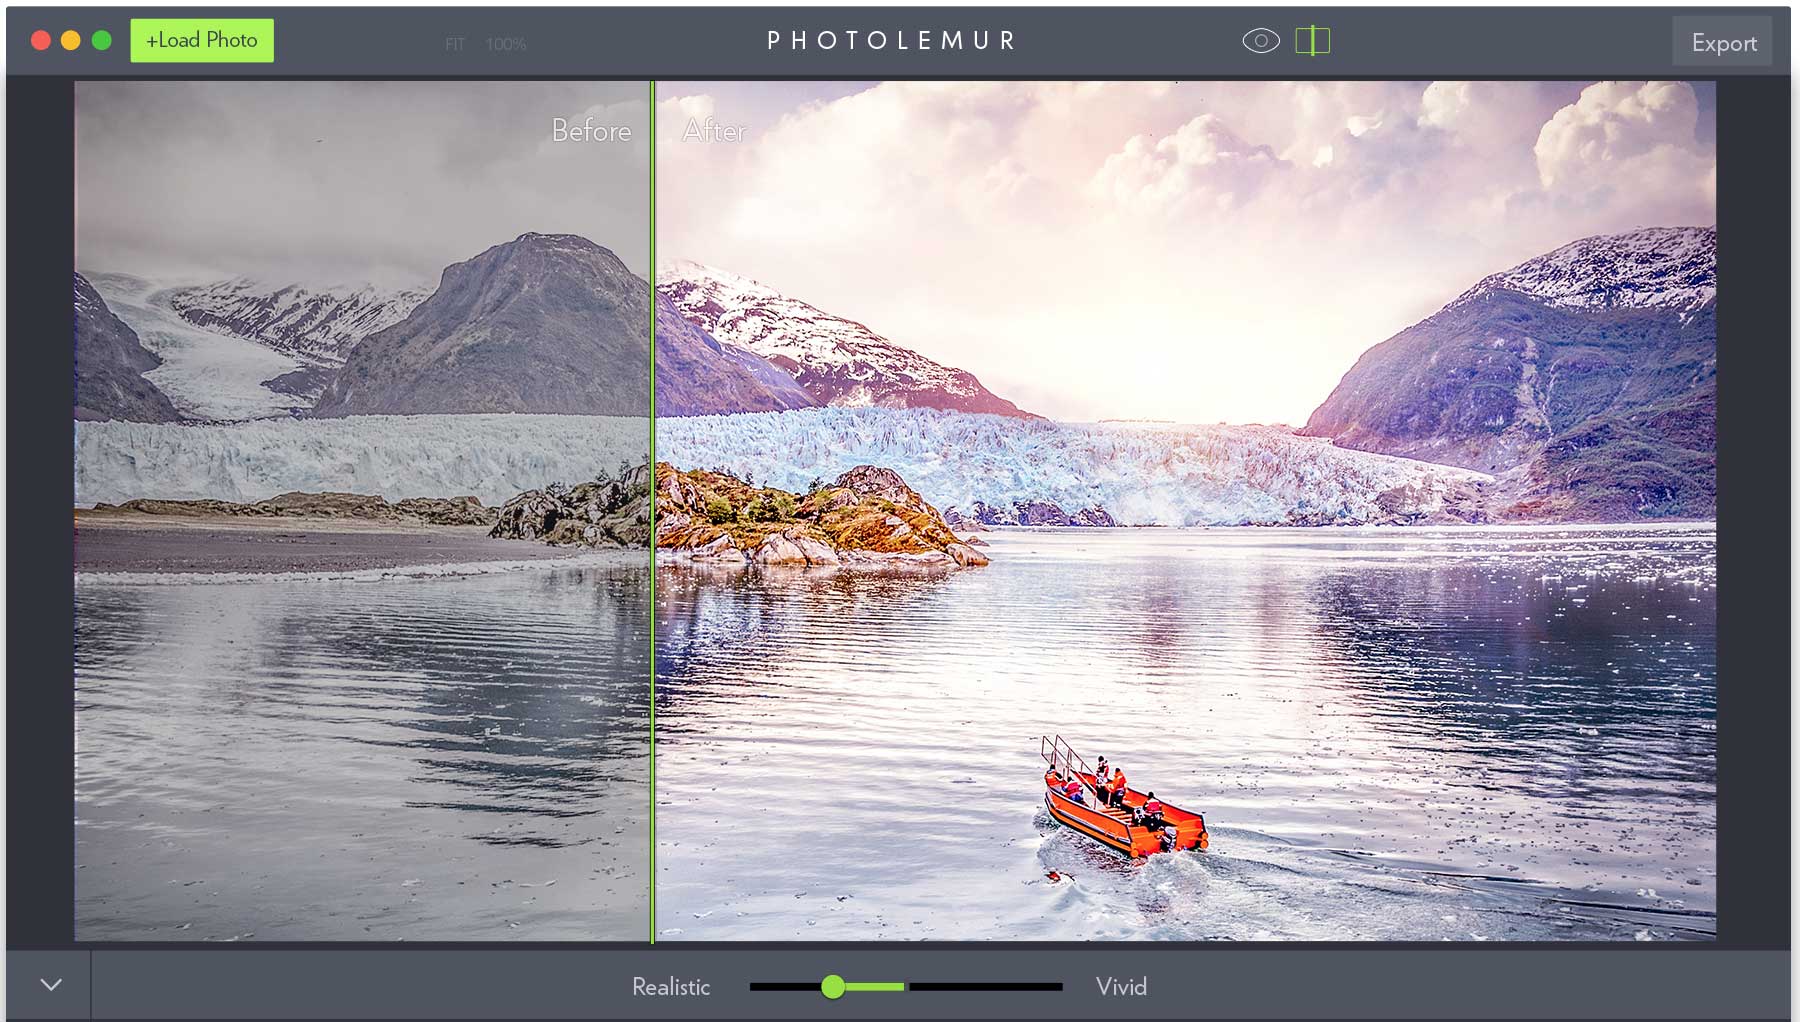
.. was first published in October 2016 as a photo quality improver for the Mac, with users paying $29 (or $39 for use on up to five Macs). For that, you could use it on up to twenty photos at a time. Not having a Mac, I never used it, but as well as a slider that let you chose how much work it did on your photo, going from 'realistic' to 'vivid', it looks like you could also do things like crop photos in the program..
.. because that was one of the features that was said to be removed in the version 2.0 release in April 2017, as part of making it a 'one click' program: a new engine would do all the enhancements automatically. It also added a Windows version and would be a free update for everyone who owned version 1.0.
Oh, it wouldn't: 2.0 users were expected to buy a subscription: for $5.99/month (so $72 a year) according to the original announcement, or $4 a month / $36 for a year according to a saved checkout page. (Yes, saying the price is 'normally' $7 when you've announced it will be free, erm, $6 a month and actually charging $3 or $4 is confusing, to put it at its best.) If you had bought 1.0, i.e. were an early user on a Mac, you got just six months free.
Either way, you could only use it on up to 300 photos a month. The limit and the shift to a subscription model did not go down well, so ten days later in May, they offered a lifetime subscription to anyone who'd bought 1.0.
This lasted all the way until.. July 2017, when they sensibly went back to a license system. People who'd paid for 1.0 or an annual subscription would get it for free, while those who were up to three months into a monthly sub got a 50% discount.
I bought it via a Humble Bundle in December, and was impressed: the results could be slightly over the top with photos of things like stained glass windows, but as an effortless 'what about this' look for portraits, landscapes, and street photography they were remarkable. Before long, every photo I took also had a version that Photolemur had had a go at, and most of those were kept.
At that point, it did a combination of things to your photos:
- Colour Recovery – increases the saturation of many colours, so reds are more 'red' for example.
- Sky Enhancement – makes what it thinks is the blue of the sky bluer, as well as sharpening and adding contrast to clouds. You're going to get some seriously blue skies.
- Foliage Enhancement – makes leaves greener. This can definitely over do it at times, but when it works, it works well.
- Exposure Compensation – making overly dark images brighter and vice versa.
- Smart Dehaze – reducing the effects of mist/fog and the haze that results in further away objects appearing lighter.
- Natural Light Correction – "keeps the appropriate warm or cool tones to best represent the time of day."
- Tint Perfection – adjusting the colour of the photo, again depending on when it thinks it was taken. At some point, I will try altering the time stamp on some photos to see if it makes a difference for these two or if it's guessing.
- JPG Fix – removing some of the 'jaggy' artefacts from overly compressed JPEG images. This isn't a problem on my photos, and it doesn't help that on that page, I cannot tell the difference between the 'before' and 'after' image.
Three things were promised as "coming soon":
- Noise Reduction – in low light, the level of the light coming into the camera's sensors can get closer to the low level of random data that is always 'seen' by the always imperfect electronics.* This results in a speckle of randomly coloured pixels in the image. There are some programs, like DxO Photolab, that are extremely good at removing it.
- Face Retouching – looking for faces in order to smooth their skin and lighten the whites of their eyes.
- Horizon Straightening – fixing curvy and crooked horizons, especially for shots involving the sea.
I quickly paid for the upgrade to version 3.0, which had been released a couple of months earlier. As well as adding support for various RAW formats to the previous JPEG / PNG / TIFF ones, it did indeed include the noise reduction and optional (but on by default) face enhancement and optional (and off by default) enlarging eyes. The promised horizon straightening didn't ever appear..
.. but styles did.
Styles are alternative looks for the results
Version 2.0 was a 'like it or lump it' program. While you could adjust just how much it applied its default effects, you couldn't alter them. With styles, you could now pick from six built-in alternative looks, each noticeably different from the default.
Of course, styles were also seen as an opportunity to make some more money, so three additional styles were offered separately for about $10 each. The upgrade offer I used included two of them for 'free'. It turned out that I was asked to download them from a public Amazon server, so I went to see if the same URL pattern would work for the other one.. and yes, it did.
If you have Photolemur, you may have seen that a fourth additional style, Holiday, was offered for free. Hmm, that's at photolemurapp.s3-accelerate.amazonaws.com/styles/Holiday.zip, so where might Fusion, Impress, and Rich have been located? (In the years since I wrote this, they've disappeared. If you're still using Photolemur and don't have them, drop me a comment.)
How do Photolemur 3 styles work?
They are supplied as a single .pstyle file for each one, but these are actually ZIP files without the .zip extension** and when you install one in Photolemur, it puts the .pstyle file into "C:/Users/[username]/AppData/Roaming/Photolemur 3/UserStyles" (on Windows, as with all other similar paths in this post), then unzips them into "C:/Users/[username]/AppData/Roaming/Photolemur 3/UserStyleData"… every. single. time. the program is started!
Because of how they're structured, the contents of Horrible.pstyle end up in "C:/Users/[username]/AppData/Roaming/Photolemur 3/UserStylesData/Horrible.pstyle/Contents", where there are four files and a directory holding another one. The built-in styles have the same structure, except the relevant files are already installed into somewhere like "C:/Users/[username]/AppData/Roaming/Photolemur 3/DefaultStylesData/BuiltIn.pstyle/Contents".
The first two files are identical in all styles:
Pkginfo – contains the string "PhotolemurStyle"
info.plist – an XML file that says that in a longer way!
The other two are:
icon.png – the basis of the small circle logo for the style when selecting which style to apply. These vary quite a lot in size, mostly because while some of them are an unnecessarily large 300×300 pixels, the one for the Rich style is a completely unnecessarily large 915×915 pixels. Some aren't square: Holiday's is 982×654 pixels. (This is by far the most significant reason some .pstyle files are larger than others!) A look at the meta information tells you that they were probably converted from JPEGs via Photoshop CC running on a Mac…
preset.pstyle – the most interesting of the four, this varies in size from 2.3k (Apollo, Fall, Mono, Noble, and Spirited) to 6.5k (Holiday). Even the ones that are the same length aren't quite identical, although much of the start of the file is. Looking they're a long ASCII string of letters (upper and lower case), digits, '+', and sometimes a couple of '=" characters at the end… some binary program or data? Oh, hang on, that's a Base64 string, isn't it?
Indeed it is, and it turns out to encode another XML, the start of which is indeed identical between all the styles. For the smaller files, the most important content is a pointer to a 'look-up table' also known as a LUT which is a fancy name for a list of 'if you see this colour, change it to this colour' values. These are located in the 'resources' subdirectory as a .cube file.. apart from Fusion (built-in) and Rich (extra), where it's .CUBE, but that's case-insensitive file systems for you.
The first comment in each says it was created via a "Adobe Lightroom Export LUT Plugin". All of them are 'LUT_3D_SIZE 32' files, i.e. have separate values for red, green, and blue for each line, with 32 evenly distributed levels for each, making 32x32x32 = 32,678 lines of values. This is obviously smaller than the 256x256x256 = 1,677,216 colours available with a JPEG, so some interpolation between values in the LUT is going on. There are several possible algorithms it could be using and which is the actual one is "left as an exercise for the reader" (i.e. I don't know which and can't be bothered to do the decompiling or image comparison work to find out!)
The size of 32 steps for each of red/green/blue is relatively unusual: if I look at ones from other sources, they tend to have 33 steps so that there are 31 steps between 0.00000 and 1.00000, or 17, or 65 steps. I also have some with 25 steps – note all these have an odd number of steps so that one is for an input value of exactly 0.5*** – and I haven't yet tried to see if Photolemur can cope with a different size.
Each of the files has the use of their LUT encoded with both the relative location (i.e. /resources/LUT-Name.cube, with the LUT-Name being a string of letters and digits of the form xxxxxxxx-xxxx-xxxx-xxxx-xxxxxxxxxxxx) and also its internal name – this means that we can see that several have identical LUTs to those sold to Luminar owners in the "Analog Film Looks" collection of presets for that program:
| Apollo | Analog_Look_014 | 'Dreamy Film' |
|---|---|---|
| Fall | Analog_Look_024 | 'Instant Retro Film' |
| Noble | Analog_Look_034 | 'Offbeat Film' |
.. and indeed the relevant files are identical to those LUTs in that collection. Several others have LUTs that are probably in another collection – Holiday refers to the 'Warm Film' LUT, Mono is 'Analog_Look_083', Spirited is Analog_Look_073, etc etc.
We can also see whose PC they came from: the desktop of Alexander Stebliy, now Head of Product Delivery at Skylum, for some of them.
Each has an OptionalDataType of 5, with a value of 50. I haven't tried altering those to see what happens.
The XML encoded in the larger .pstyle files includes other data:
| Evolve | MIPLLUTMappingEffect set to 80 – no idea what this does beyond presumably affecting how the LUT is applied | |
|---|---|---|
| Fusion | MIPLLUTMappingEffect set to around 47 | |
| also Contrast set to about 52 | ||
| also Saturation set to about -7 | ||
| also MIPLCurveEffect – RGB, with seven parameters – one, plus two each for three controls points on a curve? Doing what? |
||
| Holiday | MIPLLUTMappingEffect set to around 46 | |
| Contrast set to about -59 | ||
| Saturation set to around -26 | ||
| MIPLCurveEffect – B, with seven parameters, and MIPLCurveEffect – RGB, with eleven parameters = three and five control points respectively? RGB is obviously red/green/blue, but what does B do? |
||
| MIPLVignetteEffect – Amount about -60 Roundness around 31 Vignette Size also around 31 |
||
| Impress | MIPLLUTMappingEffect set to about 60 | |
| Contrast set to -100 | ||
| Saturation set to about 20 | ||
| MIPLCurveEffect – RGB with seven parameters | ||
| Rich | MIPLLUTMappingEffect set to about 56 | |
| MIPLCurveEffect – RGB with seven parameters |
I wonder if 'MIPL' is 'M-something I-something PhotoLemur'?
At some point, I will play with those values and see what happens, but all this does make me raise an eyebrow at the claim that "all styles were created using artificial intelligence".
In December 2018, there was a '.1' update to Photolemur 3 that made it slightly faster.. and added Klingon as one of the supported languages for the interface. I think that was the last update it ever received.
AirMagic flies in
In March 2019, Skylum released AirMagic, which is 'Photolemur for drone photos'. Existing Photolemur owners got given a 50% discount on the $39 cost, but if they waited until the autumn, a photo bundle site gave it away for free as part of a promotion.
Looking, it is clear that much of it is identical to Photolemur..
.. but not quite all of it. One of the changes is that when exporting photos, you now get a series of messages relating to drone photography, such as "Practice Yawing".
With AirMagic there were three additional separate styles available to buy, Lombok, Nias, and Rhodes. They are hosted on the same public server as the Photolemur ones, and so freely available to anyone who knows the format of the URL and guesses that you might change photolemurapp to airmagicapp…
AirMagic styles have a file extension of .astyle, but are again really ZIP files without the .zip extension. The files contained within it are the same as for Photolemur styles, except that preset.pstyle is replaced by preset.astyle.
All of the styles, built-in and optional, are of the more complicated type with assorted parameters to functions encoded in their .astyle XML file.
"Can you fly, Bobby Photolemur?"
It turns out that AirMagic will use Photolemur styles 'as is', but trying this the other way around leads to Photolemur crashing very quickly. You can get around this by renaming the preset.astyle file within the ZIP to preset.pstyle and similarly renaming the ZIP to whatever.pstyle. With that done, you can use the AirMagic styles in Photolemur.
(As it confuses at least one photo viewer, I did wonder if it mattered that the icon.png files within the AirMagic styles were, in fact, JPEGs with the wrong extension rather than actual PNG pictures… but it turns out that it doesn't.)
More interestingly, using the same style in the two programs produces usually slight – but noticeable – differences in the results. If you use Mono in AirMagic, the colours are very muted, but they are still visible, for example. Clearly, they have different settings that are applied to every image regardless of style.
My suspicion is that AirMagic does more of what it thinks is haze reduction, darkening light areas, and also deliberately doesn't make lighter coloured areas into grey.
But what are the defaults?
In Photolemur 2.1, there were two files, "C:\Program Files\Photolemur\Photolemur\Data\PresetJpg.ptlmr" and "PresetRAW.ptlmr" which contain the XML for what it was doing.
For JPEGs, it has:
- Dynamic contrast effect
- Denoise Lacplcian effect – looking at brightness
- Vibrance effect – both the general saturation (how red reds are, etc) and vibrance (boosting only the more muted colour sections further)
- Contrast again
- "Contrast Luma effect"
- "Details Adjustment Layer"
- Color Filter Adjustment Layer
The 'RAW' options have more contrast; a new Polarize Adjustment effect rather than the Denoise Lacplcian one; a lower setting for vibrance; a new Structure HDR effect / Structure Adjustment; contrast very very slightly lower, and that's all that's in that file.
Photolemur 3 is annoyingly secretive!
In Photolemur 3.0, there are four files, "C:\Program Files\Skylum\Photolemur 3\Data\Settings1.ptlmr", Settings2.ptlmr etc that doubtless have the same info. It would be a staggering coincidence if each were not base64 encoded again – the files contain only a string containing only characters that make up base64 encoded files, down to sometimes having the last ones be '==' – but they decode to something that isn't text.
Given the program's love of using XML, and the way that each of the four is mostly identical at the start, just like the preset.pstyle files looked at above, I would be utterly astonished if they weren't decoded by the program somehow into XML. But at the moment, I can't see how that is done which means that we can't see what 3.0 does or change it to see what effect that has on the results.
Interestingly, AirMagic uses a base64-encoded XML file, as used in all the styles, for its (single) options file, "C:\Program Files\Skylum\AirMagic\Data\Settings1.agmc". Was the obfuscation that Photolemur 3.0 used too much hassle / too slow for Skylum too?
| Vibrance adjustment | Saturation = about 20 Vibrance = about 13 |
|---|---|
| Highlights/shadows adjustment | Highlights = about -64 Shadows = about 74 |
| Structure HDR effect | Amount = about 29 Boost = about 86 Softness = about 87 |
| 'Accent AI 2.0 effect' | Accent boost = about 95 Amount = 100 Clarity = about 20 |
| Polarize adjustment | MIPLPolarizeEffect = about 10 |
| Contrast | ContrastAuto = about 31 |
Given the effect of circular polarising filters on sky colours, I wonder if, in this case, it's the "Polarize adjustment" that does some of the colour adjustments of the sky.
This is all labelled "AirMagicTest91.lmp", which makes me wonder if around 100 presets were generated and chosen between.
By using the info on how styles are structured above to create a 'null' style that doesn't have any of the other parameters that the longer preset.pstyle XML files have and has a 'null LUT', i.e. one that doesn't change any colour, you can see that the results are identical to the "no style" default of that program.
The way that using PL3's Mono style in AirMagic results in pictures that aren't entirely monochrome, despite containing a LUT that does have that effect, means it's an interesting question when the style's instructions are carried out: some default processing (from the original image, rather than the post-style effects?) must happen afterwards.
Speaking of annoying..
Photolemur / AirMagic bugs and annoyances
(Bug) It hasn't happened in a while, but at one point, around one in forty or so photos would be saved as a small black rectangle. This was repeatable, i.e. trying to save the same affected photo would have the same result.
(Bug) The facial enhancements aren't perfect – as we'll see in part two, when applied to the bundled sample image, a spurious light coloured pixel is added near the subject's left eye. Given how often they do work well, it's odd that Skylum would have as the only sample image one where it doesn't!
(Annoyance) When doing batch processing, even just saying "use this style on these images", it takes a while to 'applying the settings' on to the others, with high CPU use. It's not obvious that anything actually happens as a result: when exporting them, it doesn't make it quicker, but it can take minutes of PL3 getting every CPU cycle it can get its paws on just to say 'use this style and those three toggles on this image too' before you can even start the export of 100+ photos.
(Annoyance) When you have quite a few styles installed (cough) say because you've installed the additional ones from one program into the other, once you've selected one towards the right hand side of the list – after the built-in styles, they're in a row in alphabetical order of their name – then you can't select any that have scrolled off the left of the list. You can scroll the list to the right (by clicking on the part-displayed icon), but not scroll it to the left.
If the program thinks you've got a photo in portrait orientation, this can even happen with just the default styles: once you select Mono, there's no going back to Apollo.
This applies even if you 'start over' with a new photo – the only way to get the first styles back is to restart the program!
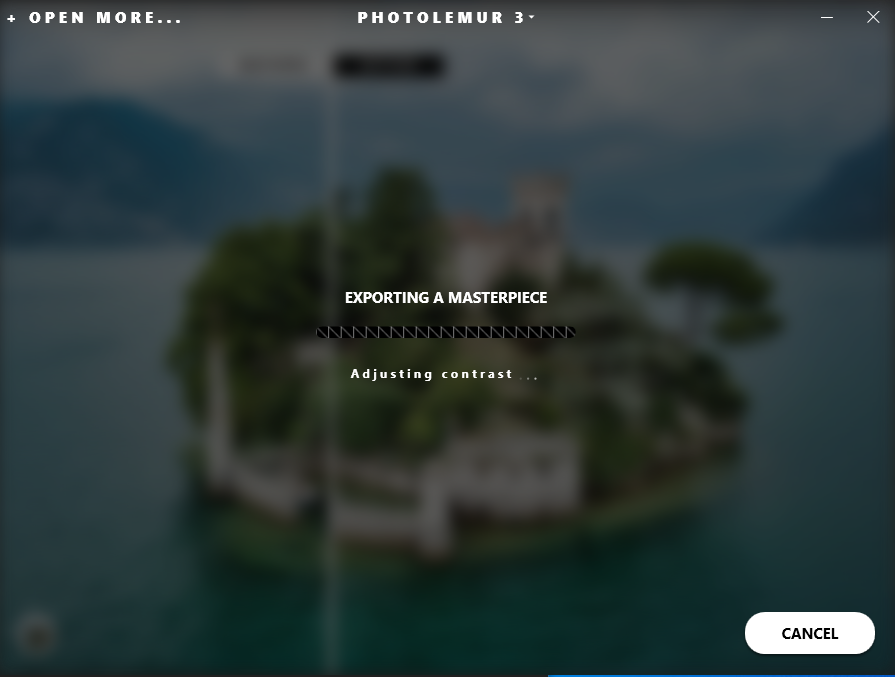
(Annoyance) After you've saved a photo and quit via the standard Windows 'close this program' button, the program tells you that you haven't saved the image.. would you like to do so before quitting?
At least it doesn't do this if you close via the program's menu…
(Annoyance) While it is working on a single image, a moving pattern of lines follows the mouse cursor around the program's window. This is just a fancy waste of GPU effects while the program is working. If you minimise the program, you get exactly the same result with no effort from your graphics… and get it slightly quicker if you are using a PC without a separate graphics card.

The same unnecessary GPU use happens when exporting results to a lesser extent.
(Annoyance) No updates for the camera database have been released in several years. Fortunately, all of my current cameras are covered by the existing one, so I'm not about to see what the 'not text' format for them is or if there's a more up to date copy elsewhere, but if you have anything from 2018 or later, be prepared to be disappointed that it isn't in the database (PDF).
Interestingly, several of the Canon cameras reference CHDK, the wonderful open source Canon Hack Development Kit, so they're not from the manufacturers or from several conventional sources for such info.
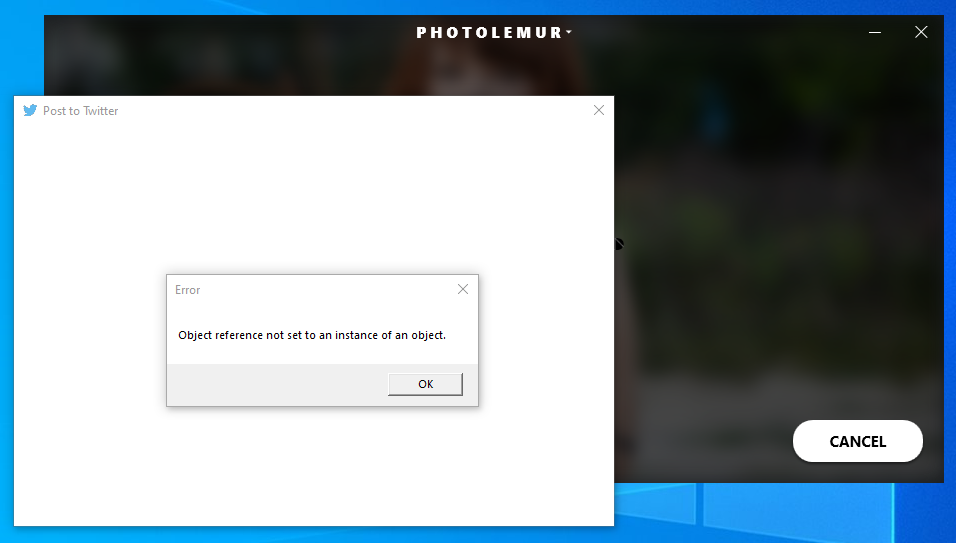
(Bug) The Windows version of the program used to be able to export photos directly to a couple of websites, including the evil that is Facebook. Those options no longer appear, although the DLL files for the export are still present. Presumably the API to post to the sites was changed, and Skylum never updated their code to reflect that.
(Bug) Mac users used to be able to use it as a plugin for the Photos app, but (apparently) can't following the release of the Catalina version of Mac OS in 2019. A more serious problem with exporting photos on the Big Sur version of the Mac OS released in 2020 was fixed, but that looks to have been the last time there was any update.
Because development on these two has stopped – some of the technology has been used in their Luminar line of programs – these are all 'WON'T FIX' as far as Skylum is concerned, which is an annoyance in itself. They've also recently removed the specific PL/AM forums on their website and not merged all of the posts they had into the 'other software' dump that some have been put in…
* I remember someone asking one of my lecturers why, if noise was always at least a potential problem for the system, you didn't just not have any. They regretted it.
** When I looked, having the first two bytes be 'PK' – the initials of Phil Katz, developer of the .zip format, and the first two bytes in all .zip files – was a big clue.
*** Consider having a four step LUT for values of 0.00000 0.33333 0.66667 1.00000 vs a five step one with 0.00000 0.25000 0.50000 0.75000 1.00000…
Wow, thx you for describing photolemure style file.
I have a few questions about Styles. Can you please reach out to me? Thank you.
Hi there, i'm wondering if you still have those style files. I've been trying to make some of my own style presets but I'm having some issues with the limited examples of the standard styles.